A Little Bit Smarter - Avoiding Obstacles
Would a "smart car" ever drive into an obstacle? Certainly not! We add an ultrasonic sensor to our vehicle that warns us in good time and stops the car before anything happens.
The HC-SR04 is a very simple and inexpensive ultrasonic sensor. An ultrasonic sensor sends a signal inaudible to us waits for the echo. From the elapsed time, you can then calculate the distance of the body that reflected the signal.

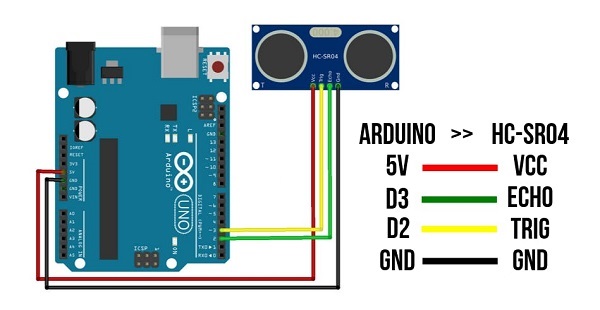
Wiring diagram for HC-SR04
Note: The sensor works with 5V supply voltage and needs very little power. So we can directly use the power supply of the Arduino board. The PIN TRIG on the HC-SR04 is used to trigger the sound signal, the PIN ECHO provides a HIGH signal as soon as the echo is received.

Code for the test
Use this code to test the sensor, the value for the estimated distance will be displayed in the serial monitor of the Arduino IDE.
/* Arduino Smart Car
 * sensor header file
 * defines a class for the ultrasonic sensor
 * (c) Stefan Hager 2021
 */


 #ifndef _SENSOR_H_
 #define _SENSOR_H_

 class Sensor
 {
   private:
    int trigg, echo;
   public:
    Sensor (int _trigg, int _echo); // constructor
    int messureDistance();
 };

 #endif
/* Arduino Smart Car
 * sensor implementation file
 * implements a class for the ultrasonic sensor
 * (c) Stefan Hager 2021
 */

#include "sensor.h"
#include "Arduino.h"

Sensor::Sensor (int _trigg, int _echo)
{
  trigg = _trigg;
  echo = _echo;
  pinMode(trigg, OUTPUT);
  pinMode(echo, INPUT);
}

int Sensor::messureDistance ()
{   int dur = 0;
    // Clears the trigPin condition
    digitalWrite(trigg, LOW);
    delayMicroseconds(2);
    // Sets the trigPin HIGH (ACTIVE) for 10 microseconds
    digitalWrite(trigg, HIGH);
    delayMicroseconds(10);
    digitalWrite(trigg, LOW);
    // Reads the echoPin, returns the sound wave travel time in microseconds
    dur = pulseIn(echo, HIGH);
    // Calculating the distance
    int dist = dur * 0.034 / 2; // Speed of sound  divided by 2 (go and back)
    return dist;
}
// Ultrasonic Sensor - Test Program
// (c) Stefan Hager 2021

#include "sensor.h"


// PIN 2 = trigger PIN 3 = echo
Sensor sensor(2,3);

void setup()
{
  Serial.begin(9600);
  Serial.println("Sensor - Test");
}
void loop()
{
  int dist = sensor.messureDistance();
  // Displays the distance on the Serial Monitor
  Serial.print("Distance: ");
  Serial.print(dist);
  Serial.println(" cm");
  delay(1000);
}
Obstacle Avoiding Car
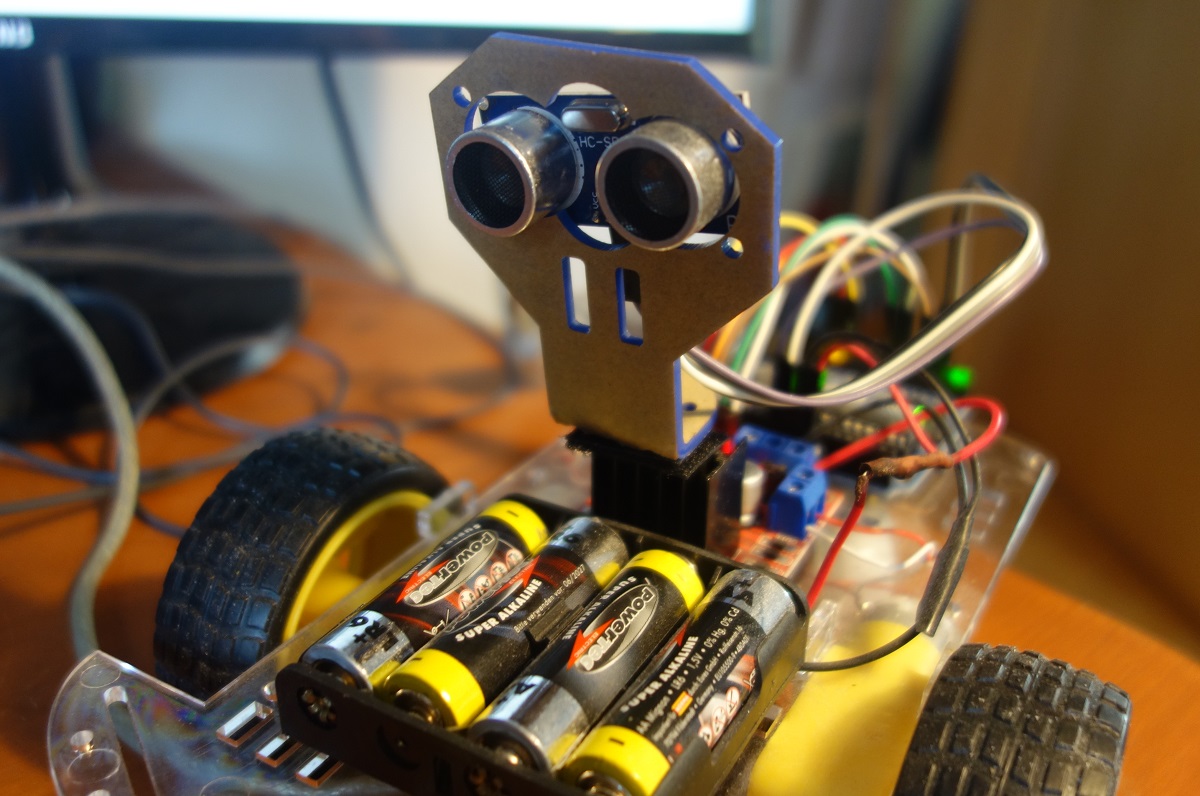
If the test was successful, now you just have to mount the sensor on the car and make sure that the sensor is interrogated periodically while driving. If the car hits an obstacle (distance < 20 cm), the car should turn around and drive in the opposite direction.

//  Arduino Smart Car
//  Drive test with obstacle avoidance
// (c) Stefan Hager, 2021

#include "Arduino.h"
#include "motor.h"
#include "sensor.h"

Motor motor1 (6,7,4);
Motor motor2 (11,12,13);
Sensor sensor(2,3);

void setup()
{
   motor1.setSpeed(250);
   motor2.setSpeed(250);
   // let it run ...
   drive();
}

void loop()
{
   // check for obstacles
   int dist = sensor.messureDistance();
   if(dist < 30)
   {
      stop();       // stop the motors
      delay(1000);  // wait a second
      turn();       // turn around
      drive();      // go again
   }

   delay(500);
}

void drive()
{
    motor1.driveForward();
    motor2.driveForward();
}

void turn()
{
    motor1.driveForward();
    motor2.driveBackward();
    // try to find the appropriate delay for a full 180 deg turn
    delay(800);
}

void stop()
{
    motor1.stop();
    motor2.stop();
}